Showing posts with label atari. Show all posts

Sunday, 7 October 2012

Upgrading / Aranym and the miniPack


Upgrading:


Other computing systems get upgraded from time to time.  'New' operating systems to replace the 'outdated' or no longer supported systems.  Almost every year there's a new release of mac os, and slightly less frequently the release of a re-versioned and re-imagined windows.  Android and other mobile phone users complain when they can't immediately get the latest versions of their operating system.

Of course there are a few expectations and hopes we all want from a system upgrade.  Perhaps, most importantly, that it will be 'pain free', that we get to keep all our data, and that our machine can still boot - ie; that we don't turn it into a brick.  The expectation with an aranym system is that I can make a reasonable backup (preferably off site) and then go back to the old setup if everything goes wrong.
So the next expectation is that everything that already worked will still work.. The so-called backward compatibility.  There are no promises with the mainstream operating systems, but they do tend to try fairly hard to not break anything intentionally.  I haven't tried running any windows 3.1 software on windows 7, but I know that mac os 9 software and now power pc software won't be running on Mac OS 10.7 or 10.8.
Our expectation for Gem / emuTos / Freemint is much higher: anything that uses the published interfaces should continue to run.. Otherwise, we call it a bug and hope that there's a patch released.
A final expectation is perhaps the most important for testing new releases.. in that we hope to be able to understand the process, and that it takes few steps, and takes little time, in that it is not such a huge undertaking that we postpone it indefinitely.  I suspect that many windows XP and vista users haven't gone to the latest available option because of the expectation that it is complicated, time consuming and slightly worrying... What will need re-installing from scratch, what software will just disappear.
We have an advantage then, that our upgrades are faster (because the operating system is just the operating system), simpler (because we can just move or rename disk images / edit configs and reboot), and more reliable (well at least simpler to revert if it just doesn't work).

So what am I doing and why... Basically I've been chickening out of upgrading, and the more often I do it, the more easy and quick it becomes, and the more often others do it, the more likely we have more reliable systems, and the more likely we can report problems that happen from one version to the next, so that these problems can be fixed.  By showing how quick and easy and understandable it is, the better.
You can also use the same software if you don't have an existing working setup and just start from scratch.

So here is my plan..


* Download the latest of everything from the following two sites:

 - This image of the os should includes the latest Emutos rom, the latest stable mint release, the latest xaaes (the bit that runs gem programs), and hopefully fvdi (the bit that does fonts and graphics).  
[Unfortunately the miniPacks are not obviously versioned so what you end up with may be more modern than what I get.]

* Backup the old config.  Also note that the old boot disk might be worth backing up.

* Install the 'boot disk' from the miniPack (by copying the image and editing the aranym config to use it).

* I also want to include as much of my previous mint config as possible, so I will be copying my /mint/xxx/mint.cnf over as well:


So here goes:

start: Backup the old config:
 Copy 'config' and '/mint/' folders to a new directory. Zip them up. login to box.net. upload.
 4 meg zip file uploaded 

0h 05m Open the minipack.zip and take a look.
 in Aranym_files rename 'disk.img' to 'miniPack.img'
 Add a folder in the Aranym config area called 'miniPack' and copy all the files over.
 Copy the new config one directory up and 
Edit the Config:

wherever there's a reference to xxx.img add miniPack in front:

[GLOBAL]
EmuTOS = miniPack/etos512k.img

[IDE0]
Present = Yes
IsCDROM = No
ByteSwap = No
ReadOnly = No
Path = miniPack/miniPack.img

Add back 'drive_c' (a folder on my machine) as a hostfs: (so I can fix the mint.cnf how I want it)
[HOSTFS]
E = drive_c

0h 17m Boot to desktop and
(tried with MacAranym present in the miniPack.. failed with the following message:
 FATAL ERROR. You must reboot the system
[update 2012 Oct 11 - there's a new release of MacAranym JIT 0.9.14 and that has probably been bundled with the latest minipack]
)
0h 25m tried with MacAranym fresh download..
 and boots ok.  I noted that there's a problem with the keyboard, but I'll fix that later.

0h 28m Copy over their mint.cnf from the 'C:/mint/' to 'E' so I can edit it on my mac [otherwise use qed].

If you can access drive 'E' then copy anything from the mint folder that you'd like to keep to the 'C' mint folder (if they've left room).

Editing the mint.cnf:
- Take your time over comparing and merging the new file from the .img and the existing from previous configuration.  As I have plenty of references to 'D' then I need to
- Add back drive 'D' ([partition 0] entries) -- see previous posts on how to create a 'D' from scratch.
- copy over ext2.xfs to 'C:/mint/'
And do a proper shutdown before I start up again (to get the aranym config file read properly).

To check this is working how I expect,
In toswin2 select 'start shell'..

0h 40m To fix the keyboard.. open two windows (double click the 'C' drive icon twice):
  C:/mint/
and 
  C:/mint/keyboard/your_choice/ (I chose Britain)

Copy your keyboard.tbl to the C:/mint/ window
 and Reboot (ie; just from the desktop).

.. And we're done ..


Comments on the current releases of the available emulators (as tested on an intel mac os 10.6.8)
MA jit - broken in 9.14
MA MMU - Too slow to consider running for any length of time
MA jit IEEE - 9.13.2 works well. CPU usage high

With thanks to:

François Le Coat (preparer of miniPack) : http://eureka.atari.org/miniPack.zip
Also of interest: (examples of aranym tuned specifically suitable for different tasks such as doing a better falcon emulation)

Wednesday, 21 April 2010

ARAnyM (finally!)


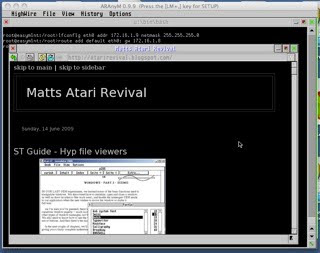
So I've finally got aranym up and running with network support.

I'm running it on a mac. Took a bit of reading the documentation. And then reading it again.

Useful notes & Difficulties:-

  • Networking works once, then after quitting Aranym, it won't work again until I restart the mac. Nothing on google about the error messages. You'll know if it might work if you're asked for the admin password.
  • Getting Easymint installed from two downloaded partitions meant that my native boot files needed moving to drive E:
  • Which meant editing a few config files, to change paths.
  • jit compiler is 10x faster, but seems to have trouble running the included (kronos) benchmarking software
  • my mouse won't leave the atari screen, so check the keyboard configuration page for macs.. [aranym wiki] which tells me, if I've got the config right its 'left shift left ctrl left alt' oh well that still isn't working.


Useful config bits:

~/Documents/Aranym_files/config

...
[ETH0]
Type = ptp
Tunnel = tap1
HostIP = 172.16.1.8
AtariIP = 172.16.1.9
Netmask = 255.255.255.0
MAC = 00:41:45:54:48:30
...
on the (Atari) command line:
>ifconfig eth0 addr 172.16.1.9 netmask 255.255.255.0
>route add default eth0: gw 172.16.1.8

I suspect there's plenty more questions about getting this working

Here are some useful links:
Get ARAnyM
ARAnyM project page
emutos- a free rom which you will need unless you have a falcon
useful atari desktop software -- the file afros812.zip contains drive_c and all the apps like xaaes, some fonts and highwire, the web-browser.
aranym wiki - help you with the config file, some potentially confusing information here.. !! Read the documentation that came with the download to get networking to work !!
easymint gives you all the freemint stuff (ie; all the unix style software you love eg; grep, a newer bash, perl 5.6)
tuntap for creating that virtual network you might(*) need to create the atari network. !! Read the documentation that came with your aranym download !!
*Alternatively there is a direct connection option.. thanks to Philipp Donzé hopefully I'll get that working soon ;-)

Sunday, 14 June 2009

ST Guide - Hyp file viewers


In the Atari scene these days you will find documentation for Atari software in .hyp format. The traditional program used to view these is ST Guide. I found a german demo of the program called 'stguide.zip' which contained:
ST-GUIDE.APP
ST-GUIDE.HYP
ST-GUIDE.INF
ST-GUIDE.REF
I might claim I got it from here but I can't be sure.
Update 21-July-2009 There is another version of this downloadable from 16/32 systems on the downloads page. direct download

Installation:
Just unzip the files and possibly make a copy of ST-GUIDE.APP, renaming it as ST-GUIDE.ACC and put it in the root folder.
It also would be possible to associate files with the extension .HYP with ST-GUIDE.APP in your favourite desktop. (Tos 2.06 upwards makes this easy)

I also found a file called stgde101.zoo (zoo.ttp -extract stgde101.zip) which has nothing to do with ST Guide but is:
'TAG - The Atari Guide' by Keith R. Marshall and is part of the 'galactic guide' project. Its file viewer is called STGuide. (Its probably more than just a file viewer...)

HYPView

The next option I've seen recommended is HYPView, available from here. They have screenshots and I tried out version 0.40.0
And so I tried it out, and in 640x480x16 colours, it started and didn't seem too terrible, in that I got as far as selecting a .hyp file to view, but it didn't
actually display anything.
So then I tried putting the hyp files into C:/gemsys/guides/
and that didn't make much difference. I also note that when I exited the program the keyboard stopped working. So that sounds like a bad crash.
If anyone has better success with this program I'd love to hear from you :-)

The other alternative for Windows users is to use winguide:
http://frankrueger.dnsalias.net/old_homepage/#winguide

This worked well for me and only the menus are in german. There appears to be an option to save your .hyp file as a .html file. I tried it and it works. You end up with lots of .html files (one per page) and a few additional images too. Unfortunately I started this post with the aim of getting gdos working too, and we've gone sideways.

Back in the original ST-Guide, it expects you to have installed a 'font selector' to let you change the screen font used to display stuff. This might be useful so you can look at a helpfile while also looking at your code/work/whatever if you could only choose a smaller font.

Font Selectors

In theory you will want a working selection of fonts already installed, however I'm going the simple solution first because gdos (and alternatives) may be a bit tricky.
So I found the file fontsel.zip, this contained:
FONTSEL.HYP - german .hyp file
FONTSEL.PRG
FONTSEL.REF
FONTSEL.TXT - german documentation
FONTSEL.ENG - english translation of the documentation
INSTALL.ENG - english installation instructions for the impatient

Basically, the simple way to install it is to put FONTSEL.PRG into the auto folder and reboot. Then in STGUIDE, you can select from a range of built in 'SYSTEM' fonts. They are very dull monospaced ones, but have the advantage of being quick to display.
Also of note in the german documentation is a list of other font selectors, which I'll copy and paste for your reference here (thanks to winguide):

UFSL von [Michael Thänitz]:
der Prototyp, [UFSL-Schnittstelle]

xUFSL von [Stefan Rogel]:
erster Nachfolger von UFSL mit erweiterter Schnittstelle

FontSel von [Holger Weets]:
kompakter Nachfolger von UFSL, Updates von Ch. Zwerschke

[Calvino] von [Dirk Haun]:
moderner Nachfolger von UFSL, neue [xFSL-Schnittstelle]

[HuGo!] von [Stefan Rogel]:
Nachfolger von xUFSL mit [xFSL-Schnittstelle]

Font-Selektor aus "Magic" von [Peter Hellinger]:
Bestandteil von Magic (nicht von MagiC!)

Font-Selektor aus "ACSpro" von [Stefan Bachert] und [Oliver Michalak]
Bestandteil (Objekt) von ACSpro

[FontSelector] aus "EnhancedGEM" von [Christian Grunenberg]:
neues Konzept, [Font-Protokoll] mit GEM-Nachrichten

[FONTselector] von [Hayo Schmidt]:
aus dem AES-Font-Loader-Paket, FOse-Schnittstelle

Unfortunately the links didn't go anywhere, so it's a case of typing in the names of the authors and seeing what comes up in google.

Installing GDOS or.. getting a nicer looking font system to work.

On the one hand, there is plenty of information about GDOS.. On the other hand, who wants to use the original GDOS that needs lots of manual editing of assign.sys files, and then trying to guess which resolution you're in. And all that for bitmapped (non-scalable) fonts. There must be an easier way..

Here is an example assign.sys to remind you of how horrible it all is:
example.txt

So I'll be needing some fonts named in the style XXYYNN.FNT where NN is the font size in points, while YY is the 'name' of the font eg; Times Roman might be TR...

I'll also be needing something like gdos.prg for the auto folder, and screen.sys? possibly as a 'screen' driver. Not sure about that one, I know you do need one for any printers you have.

A Shortcut..
I cheated and went straight for fontgdos, from "Atari Explorer Online Volume 1 Issue 03" which contained two accessories: FONTGDOS.ACC and FSM.ACC (I put both of these in the root of C:) and also FONTGDOS.PRG which I put in the C:/AUTO/ folder. One of these desk accessories lets you choose the folder for your fonts and select which fonts are associated with which screen resolution or printer (ie; you don't want printer fonts to be in your screen section of assign.sys, otherwise you might get a size 13 printer font - which would look huge on screen and then a 14 point screen font which then looks tiny -- worse still FONTGDOS may just crash, because it can.)

For whatever reason gemulator was being difficult and assign.sys would not save no matter what I did. Eventually I figured out how to disable drive A: and changed the boot device to C: and then everything went a bit smoother.

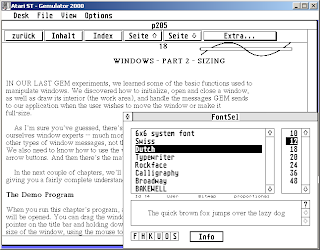
Finally the next stage was finding some real fonts.. I found the file gdsfonts.zoo and that had a few fonts to choose from. I installed almost all the ones with HI at the end of the names. And then it liked to stop working entirely, gdos wouldn't show any of the fonts I'd chosen. I opened up the ASSIGN.SYS file and got rid of the font starting with a number. Then everything was fine and I was able to view STGuide files with a different font to the system one. (see the screenshot)

This post has been a little longer than I expected, but the point is that once you've got the hang of getting a couple of fonts installed, you can probably consider using some of the more graphical atari programs that like scalable fonts, AtariWorks is one I'll be trying out, if I can find it.. Also I might see if I can find my old copy of fonty, a realtime font generator..

Some reference information:
For a really interesting and way too in-depth article about GDOS (and the various ones you could use to use true-type fonts and therefore save yourself from only having 4 fonts available in 4 different sizes!) and also get real printer drivers (possibly-- not sure if there's a useful 'image' driver or 'pdf' driver), have a look at
this and read about Speedo GDOS (v 5 upwards) and NVDI 3.0 and above. Both of these programs offer to let you use true type fonts (ie; the ones that come with windows ;-) and let you scale them to any old size, so of course this would be useful if you were for example trying to view web pages from the internet)
I haven't been able to try either and I think it might be a bit difficult to get hold of this commercial software.. As I previously mentioned.. if you wanted to use Papyrus or Atari Works, you'd benefit immensely.

In addition this site 16/32 Systems has other interesting software. (16/32 Systems, 156 Maidstone Road, Chatham, Kent ME4 6EN). The site was last updated at the end of may this year, so I think prices and products are up-to date. He writes:

28 May 2009
Top Ten Products Sold in 2009 so far

1 - Iron Soldier for the Atari Jaguar
2 - Cybermorph Empty Box
3 - Chips Challenge for the Atari Lynx
4 - Dragon: The Bruce Lee Story for the Atari Jaguar
5 - European Soccer Challenge for the Atari Lynx
6 - Atari Ring Binder
7 - Bubsy The Bobcat for the Atari Jaguar
8 - 1Mb Ram
9 - Desert Strike Box
10 - Yatsuna 1 - The Alchemy Cubes

Monday, 1 June 2009

Real Atari Computers and Compatibles

Atari's last computer was the Falcon in about 1993. Then they went bust. After that, a company called c-lab 're-badged' Falcons for the music market (with stronger cases and better sound connectors). Since then, a couple of companies manufactured clones..
And so onto today. There are a number of options to get a modern fast computer that runs much faster than the speeds available when the Falcon was first released.

Falcon Upgrade board
Rodolphe Czuba makes upgrade boards that connect to the Falcon and replace the space taken up with the original power supply with a motorola 68060.  Unfortunately, he needs an order of 25 boards before he will make another batch.
The CT63 board allows you to run software at between 80 and 100mhz, and can be fitted without soldering. You still need to provide the ram and an atx power supply.
more details.

The benchmarks are interesting too. Its probably worth reading the details of what technical difficulties that could possibly arise.  To get yourself on the waiting list, find out more here


Atari Coldfire Project
The next option to get a new atari is the Atari Coldfire Project.. This is basically a new computer which sits inside a pc case. Instead of running a 680x0 processor, they use the motorola coldfire processor which is capable of running at 266MHz and should provide everything a modern computer should have.
The website provides lots of details and has been very recently updated. It seems like a very exciting project. The cost for developer boards seems reasonable for a new computer, although perhaps your opinion depends on whether you compare it with a pc laptop or whether you view it on its own strengths.

Suska
Suska III comprises 2 different projects. Both appear to be an ambitious idea to put an entire STE on a chip. It sounds as though the project is nearly completed. The second system takes a different approach, to update the STE to a more modern platform, in that it would have USB ports, an ethernet interface and the ability to read Micro SD-Cards. The idea would be that these would both be very energy efficient, tiny computers.. The updated edition would have no moving parts and make an ideal platform for portable devices or non-portable network devices..
More details from the website. The latest news from april is that Suska-III-C tests are in progress and up to now successful. They are prepareing information material and user manuals.

So let the designers know your thoughts, particularly if you'd like to buy!!

Sunday, 24 May 2009

recommended software to get started with...

There are still a few people developing new software for the standard (non-multitasking) TOS.

Firstly, desktop replacements: I found teradesk and I like it. It is available from
here.

I found an editor which is specifically for html. Only I like to program so I'm using it as a normal text editor too. Its called Joe. There are a few other programs available from this page, they all seem to be free and the author seems to be a bit of a fan of GFA basic. Get it from here.

And finally, I wanted to get perl for the Atari. The latest version that I see that runs with TOS is version 4, and these are found in the form of zoo archives. Pain in the neck...
Anyway the Perl files I found were:
perl4_10.zoo (252kb)
perl_419.zoo (191kb)

Then the zoo archive program was zoo21.lzh

And to unpack the zoo program I used winrar (boo.. hiss..)

So, once I had ZOO.TTP and readme.st, it was just a matter of typing in the correct command line. Which turned out to be a right pain because I couldn't find the forward slash key..
In Teradesk, I ran Zoo.ttp and entered 'x C:/ATARI/perl_419.zoo'
and hey presto, it all unpacked.

Perl 4 is not as cool as later versions of perl and perhaps there's a 'command line' for the ST that would make error messages stay on-screen for longer, but any bugs in my perl didn't seem to be usefully reported to the screen. After a lot of trial and error, I wrote a working prime number generator..

@primes = (2);

$t_s = time;
for ($i = 3; $i < 35000; $i = $i+2) {
$sqrt_i = sqrt($i);
$prime = 1;
foreach $k (@primes) {
if ( 0== $i%$k) {
$prime = 0;
# print " $i is divisible by $k \n";
last;
} elsif ($k > $sqrt_i) {
last;
}
}
if ($prime) {
push (@primes, $i);
}
}
$t_e = time;

The two biggest bugs were:
'push @primes, $i;' -- didn't work because you need brackets for push.
'if ($i%$k) {' -- didn't work because that wasn't the correct test..
'if (not $i%$k) {' -- should have worked, but seems perl 4 doesn't work like that.

So that's plenty enough for one day...

Getting Started

I personally have used Gemulator in the past for working in the Atari world.. Its a fast emulator and generally pretty reliable once you've got going.
So as I didn't have it on my computer, here's a guide from the beginning:
1. Get Gemulator -- either the smaller version (Gemulator 2000) or the latest 'beta' version which may be faster on your computer.
Download from
www.emulators.com

2. Next step is to find some roms. Of course that's no longer as much of a hassle because there's a freeware (new development) ROM which you can use to get you started called 'EmuTOS'. Available from
emutos.sourceforge.net

Personally, I also find that Tos 2.06 to be pretty reliable (you can either find a working machine with it already installed and dump it to floppy and copy that to your pc, or find an alternate source)

Either way, the older Gemulator expects you to call the rom TOS.IMG and doesn't really make it easy to switch between different roms in the same path.

Gemulator lets you access your PC hard drive as a 'C:' drive etc. so you can put Atari applications into an Auto folder and boot with winsizer.prg in there to get a high resolution (I find 640x480 in 16 colours to be sufficient)..

So then all that's left to do is download software (usually zipped) and stick it on your hard drive.
Of course there's the slight problem that some software is for better machines and setups than what I've got working so far, so as I go on I'll find more useful apps and utilities to get the most from the system.

Introduction

I seem to have forgotten how to use the Atari ST -- Mostly because I haven't gotten round to it..
Anyway: No more excuses.. Here I will ocasionally document what I've done using the Gem based operating system.
And maybe try and tie together other bits of the internet about Atari developments.